Introduction
I have had a Raspberry Pi B+ for a while now, and I was looking to setup a very minimal Linux OS. I am sure this would work fine with the Pi 2.
Although the other Raspberry Pi OSs are great, a lot of them are too feature-full (read bloated) and have a packaged GUI that I would never use. Therefore, I wanted to install something much more naked than the ones on the Raspberry Pi website.
Enter, Moebius. A few words from the Moebius site:
[Moebius] is a Raspberry Pi armhf Debian based distribution targeted to have a minimal footprint. Size, speed and optimizations are main goals for this distro...
With that said, the unzipped img file is about 110Mb. That is pretty small!
The other thing that Moebius does is remove the default Raspbian sources from apt-get. This means you can't just download all the Rasbian packages you want.
Moebius introduces the idea of containers. This isn't the same container technology like Docker. The "containers" are more like groups of packages. When installing a Moebius container, everything is installed in /usr/bin as if it came with the system.
I am going to provide a little walkthrough to get started with Moebius as a light-weight development environment, as well as how to install some other tools.
Initial Setup
First, visit the Moebius Sourceforge page and follow the instructions to download Moebius. The basic instructions tell you how to copy the img to the SD Card. Once everything is setup and the Raspberry Pi has booted, complete the following:
- Either connect a screen and keyboard to the pi, or SSH to the pi
- The default user is
rootand password ismoebius - When logged in, run
moebius
Moebius command line app
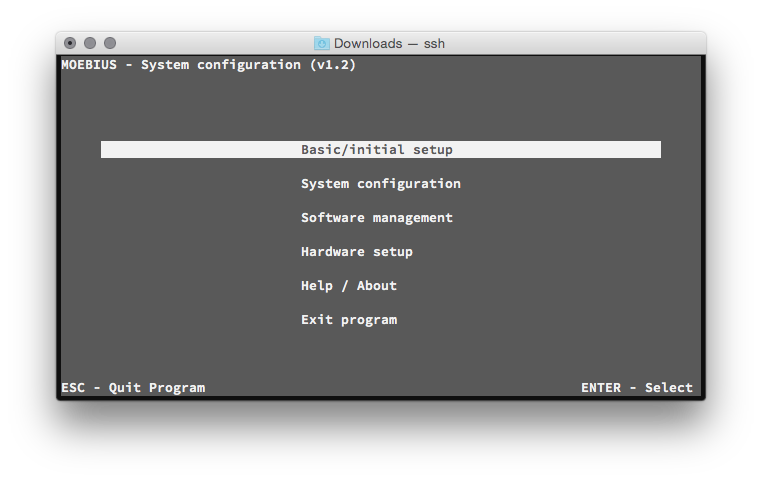
Moebius is the name of the OS, but also the name of a sweet little built-in command line tool to setup the rest of the Pi.
SSH Niceness
Optional: Add your public key to Moebius in order to ssh without a password. This is not required, but it does make popping in and out of the Pi nice and quick. Plus, no password to remember!
Moebius does not come with nano! If you are not familiar with the vi tool, you should use this site to learn some basics.
Just create ~/.ssh and then use vi ~/.ssh/authorized_keys to create a new file, then paste in your public key.
Dev Environment Setup
- Run
moebiusand selectBasic/Initial Setup - Choose
Autoresize SD partition, follow the instructions - Run
apt-get update - Run
apt-get install tzdata - Run
moebiusand selectBasic/Initial Setup, chooseSystem timezone setupand follow instructions - In
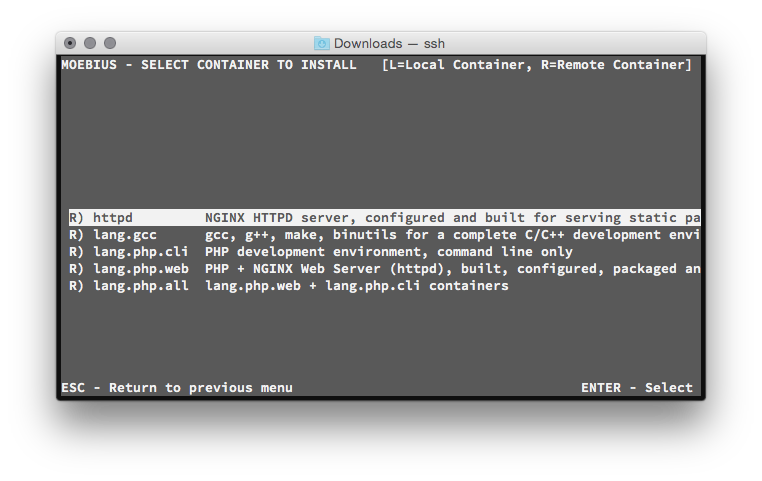
moebius, selectSoftware Managementand selectUpdate containers list from repository - Do the same as above except choose
Install a containerfrom theSoftware Managementmenu - Select the
lang.gcccontainer
Moebius container command line app
You may get an error telling you to run dpkg --configure -a. If this happens, press any key to close the container installed and then run that command. When that completes, try to install the lang.gcc container again.
You may have to repeat the process above multiple times. I did it twice.
Once the container is installed, you should have make and gcc, and a bunch of other tools on your system.
Install git
You must install the lang.gcc container first. That container provides the necessary compilers we need in order to build git.
- Get the required development files with
apt-get install openssl-dev curl-dev libexpat-dev dropbear-dev coreutils coreutils-dev - Download the latest zip archive
wget https://github.com/git/git/archive/v2.3.3.zip - Run
unzip v2.3.3.zipand thencd v2.3.3/ - Allow the scripts to run with
chmod +x *.sh && chmod +x check_bindir
Following the official INSTALL in the git source code repository, we want to leave out some of the features in order to build without some of the required libraries.
To do this, we need to run:
make NO_PERL=YesPlease NO_TCLTK=YesPlease NO_GETTEXT=YesPlease prefix=/usr install
This will take a while to build, so grab a coffee or a beer.
Note: This command does not build the docs, so if you want those, you will have to consult the INSTALL file in the git repo.
Samba setup
Samba lets us access the Pi like a hard drive on our local network. Samba works well with Windows and OSX, and of course Linux as well.
If you are not familiar with the vi tool, you should use this site to learn some basics.
Complete the following to setup Samba:
- run
apt-get install samba - open the config with
vi /etc/samba/smb.conf - then complete the following:
# find in the top part of the file
workgroup = your_workgroup_name
# find and uncomment this line
wins support = yes
# add to the bottom of the file
[pihome]
  comment= Pi Home
  path=/home/
  browseable=Yes
  writeable=Yes
  only guest=no
  create mask=0777
  directory mask=0777
  public=no
- set the samba password with
smbpasswd -a root
Install lit and luvit
Again, have lang.gcc installed before continuing.
I have been playing with Lit and Luvit. They are like lightweight versions of Node.js, but written with Lua. So let's install them with a series of commands:
apt-get install curl
curl -L https://github.com/luvit/lit/raw/master/get-lit.sh | sh
mkdir -p /usr/local/bin
mv lit /usr/local/bin/lit
lit make lit://luvit/luvit
mv luvit /usr/local/bin/luvit
Try running lit version and then luvit --version to see if the frameworks are installed.
Finished
You should now have everything setup to get around. If you find any problems with my instructions, please let me know in the comments and I will update them!

James Doyle
I'm a full-stack developer, co-organizer of PHP Vancouver meetup, and winner of a Canadian Developer 30 under 30 award. I'm a huge Open Source advocate and contributor to a lot of projects in my community. When I am not sitting at a computer, I'm trying to perfect some other skill.